Golang标准库在1.7版本引入了context,它是goroutine的上下文,包含了goroutine的运行状态、环境等信息。context则主要用来在goroutine之间传递上下文信息,包括:取消信号、超时时间、截止时间、键值对等。
Context是什么
在Golang的Server里,通常每个请求都会启动若干个goroutine同时进行工作:有些用于与数据库建立连接,有些用于调用接口获取数据……
这些goroutine则需要共享这个请求的基本数据,例如最常见的,登录的鉴权token,处理请求的最大超时时间等等。当请求被取消或者是处理时间超过超时时间,这次请求都将被直接抛弃。这时,所有正在为这个请求工作的goroutine都需要快速退出,系统回收相关的资源。
context包就是为了解决这些问题而开发的,当一个请求衍生了很多相互关联的goroutine时,它可以用于解决这些goroutine的退出通知和数据传递等功能。
源码概览
接下来我们将基于go1.24.3版本来进行源码的深入分析。在进行分析之前,让我们首先从全局梳理一下Context源码的结构。其中包含接口与结构体如下: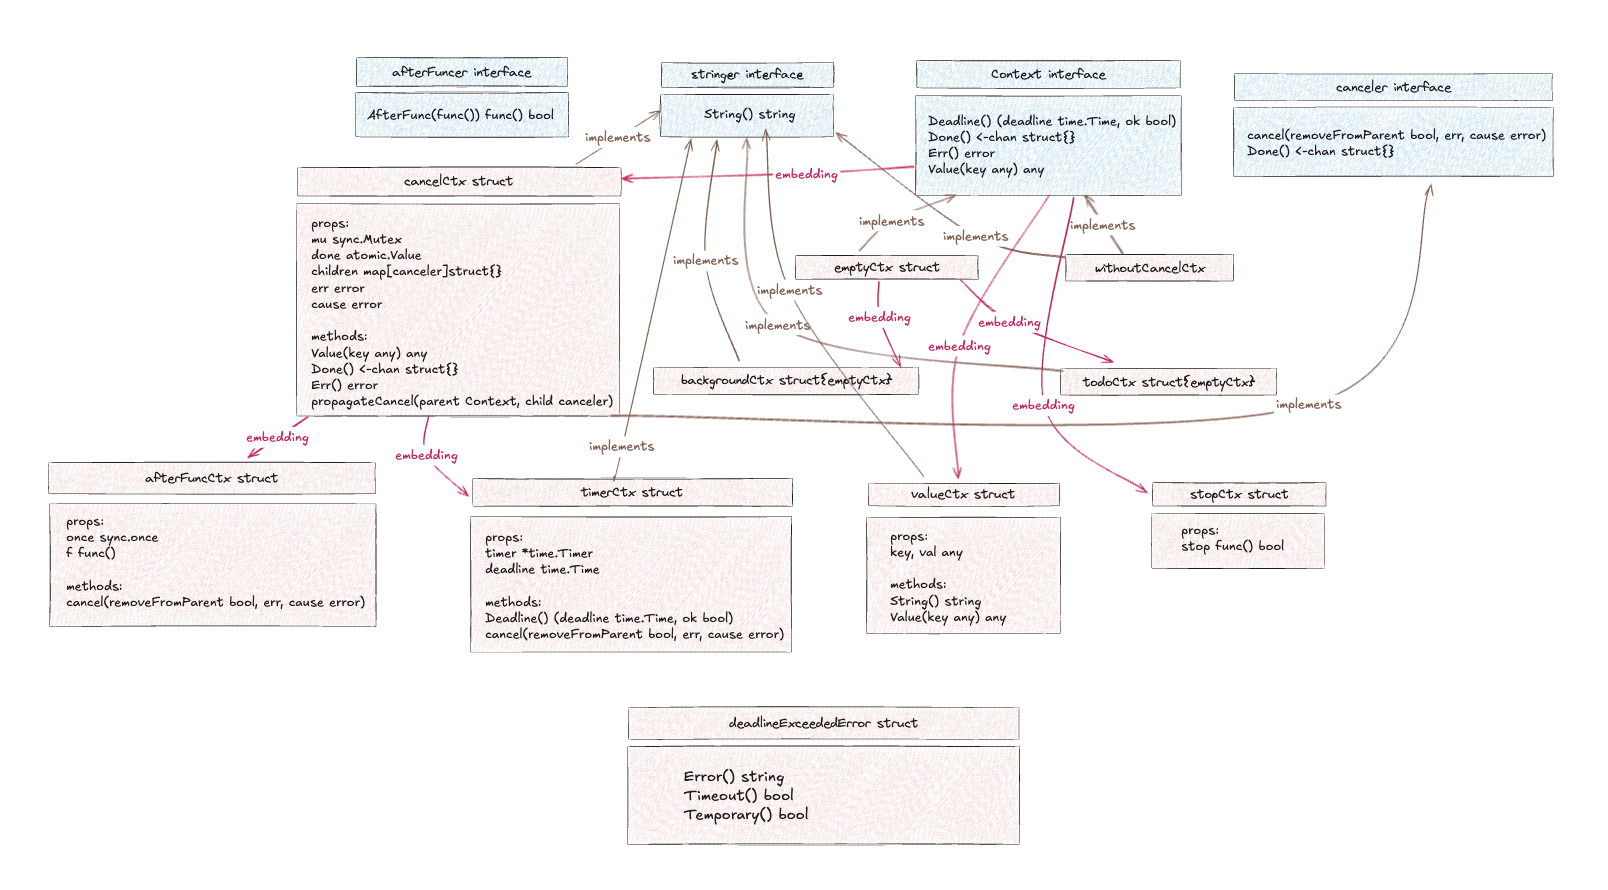
包含函数、变量和类型如下: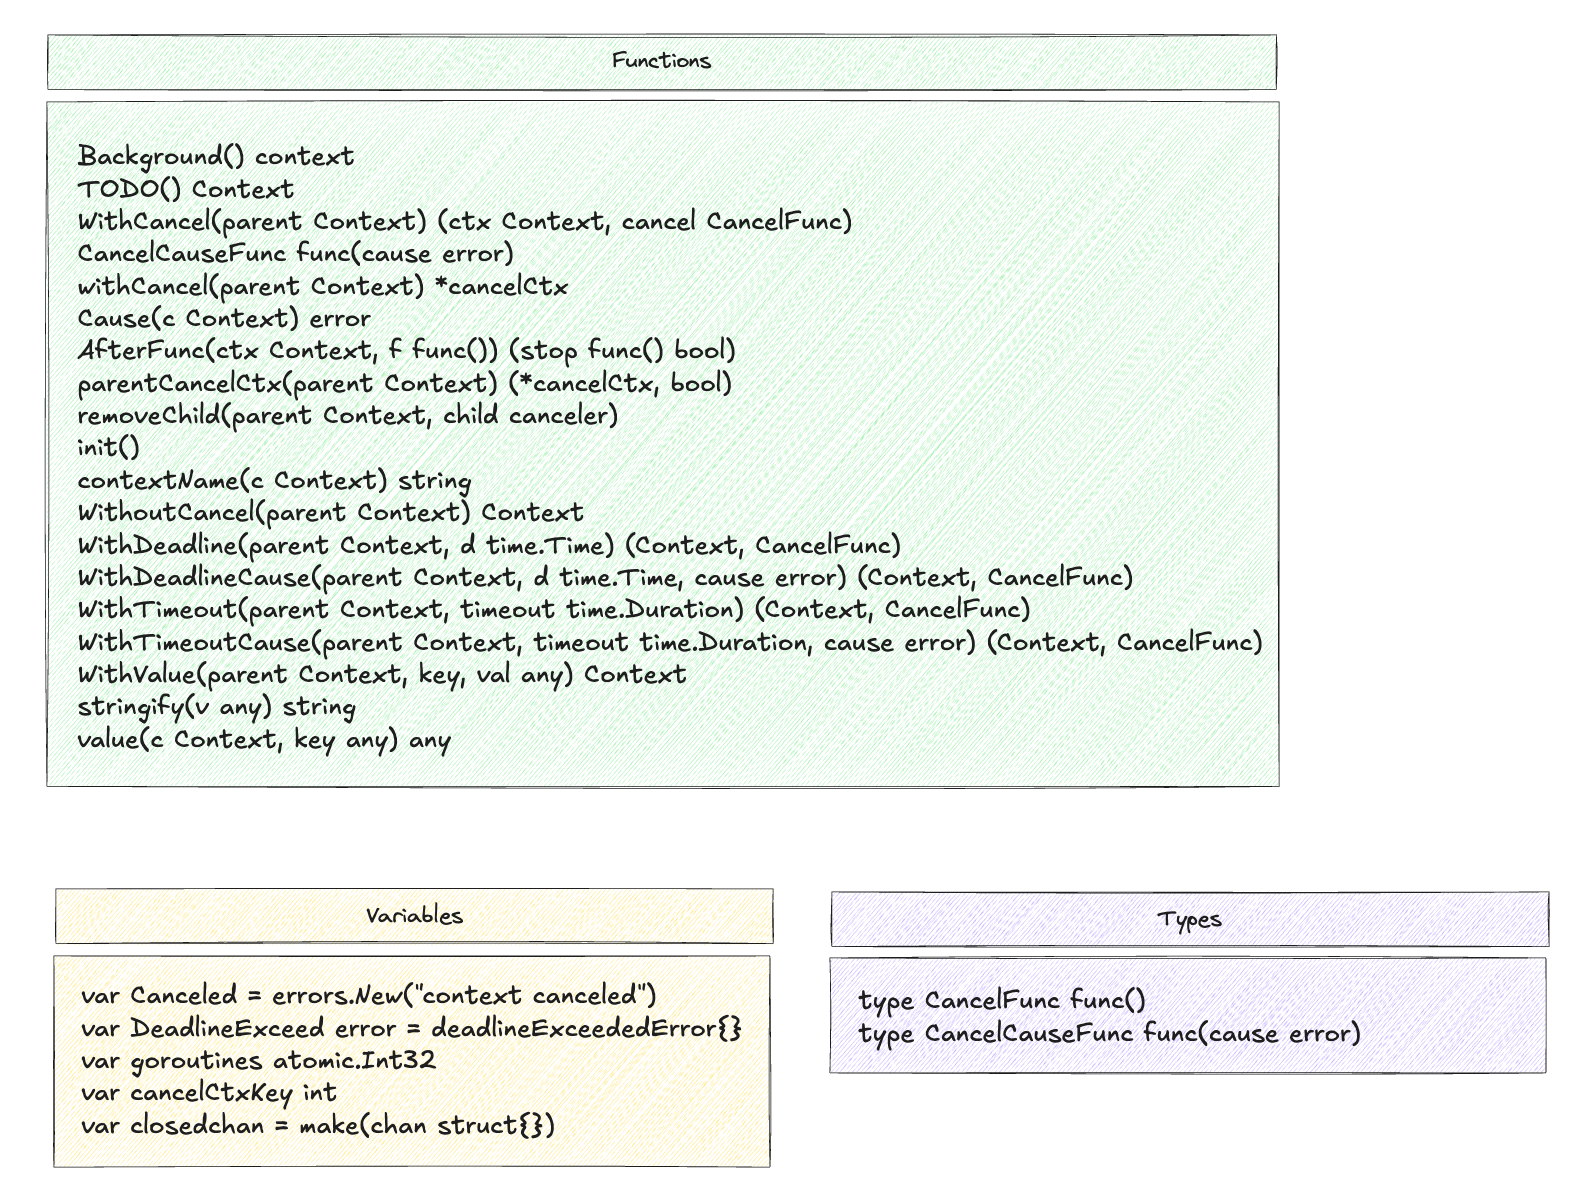
源码剖析
Context
接下来,我们就可以逐一进行源码的分析了。显然,源码的主干为Context interface,其定义如下:
1 | type Context interface { |
在Context接口中,定义了四个幂等的方法:
Deadline方法会返回Context的过期时间。Done方法会返回一个channel,这个channel会在Context被取消时被关闭。这是一个只读的channel,我们知道当读一个关闭的channel时会读出来相应类型的零值。因此在子协程中,除非这个channel已经被关闭,否则是不会读出来任何东西的。Err方法会返回一个错误。如果Done这个channel被关闭了,Err会返回关闭的原因。如果是因为超过截止日期,则会返回DeadlineExceeded,如果是除此以外的其他原因被取消,则会返回Canceled。Value会获取Context当中的key对应的value,key不存在时则会返回nil。
canceler
接下来看看另一个接口canceler。
1 | type canceler interface { |
canceler是一种可以直接被取消的Context类型。它的实现类包括*cancelCtx和*timerCtx。
emptyCtx
1 | type emptyCtx struct{} |
emptyCtx是Context的一个实现,也是backgroundCtx和todoCtx共同的基础。它永远不会被取消,没有值,也没有过期时间。
backgroundCtx&todoCtx
1 | type backgroundCtx struct{ emptyCtx } |
backgroundCtx与todoCtx除了名称不同外,几乎没有任何区别,它们都属于emptyCtx类型。
Background方法会返回一个空的Context,它永远不会被取消,没有值,也没有过期时间。它通常会被用在main方法、初始化和测试这些场景当中,作为顶层的Context接收请求。TODO方法同样会返回一个空的Context。当不清楚使用哪种Context,或者是在调用一个需要传递Context参数但没有其他Context可使用时,就可以使用context.TODO。可以理解为不知道用什么的时候就先用它“占个位置”,等到后面再换成具体的Context。
cancelCtx
接下来看一个重要的Context:
1 | type cancelCtx struct { |
cancelCtx实现了canceler接口,但是并没有实现Context接口(没有实现Context中的Deadline方法),而是将其embed到了结构体当中。可见,它必然是某个Context的子Context。它定义了以下的几个字段:
mu是一把锁,用于实现对其他字段的并发控制。done实际是chan struct{}类型,与Context中的Done类似,用于反映cancelContext的生命周期(是否存活)。children是一个集合,它存放了cancelCtx的所有子Context。err记录了当前cancelCtx的错误。cause记录了取消操作的原因。
1 | func (c *cancelCtx) Value(key any) any { |
在Value方法中,判断了传入的key是否为特定的cancelCtxKey,如果是的话就返回cancelCtx自身的指针。cancelCtxKey被定义出来的目的就是为了定制化一个能够直接返回cancelCtx自身的key,实现对cancelCtx类型的快速判断。
如果不是这个特定的key,则会走通用的函数value取值返回。
1 | func (c *cancelCtx) Done() <-chan struct{} { |
Done方法的执行流程如下图所示: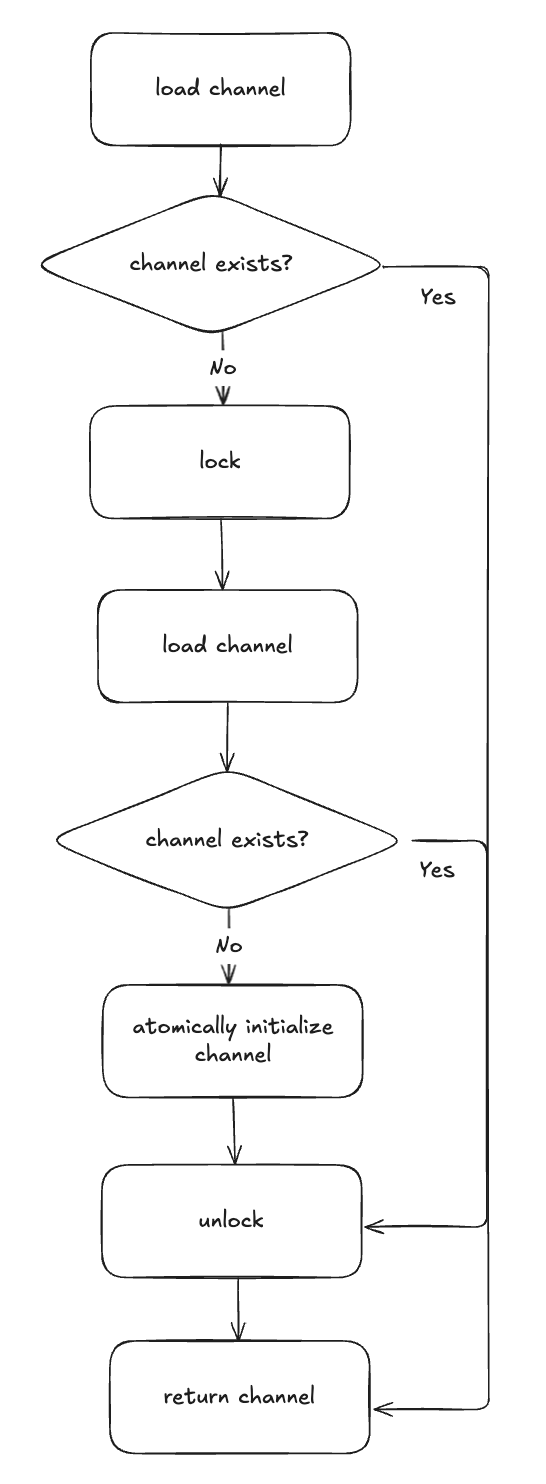
- 首先会尝试读取
cancelCtx中的done channel,如果已存在的话就直接返回; - 如果不存在,则加锁检查
channel是否存在,存在则返回。这里做了一个double-check的动作,是为了防止并发情况下在第一次检查和加锁之间这段时间进行了channel的初始化动作导致误判; - 如果还是不存在,那就说明
channel确实没有被创建过,就可以进行channel的初始化并返回。这里体现了channel的懒加载机制,只有当调用Done方法时才会去创建channel。
1 | func (c *cancelCtx) Err() error { |
Err方法的实现就很简单了,直接加把锁去读err字段。
1 | func (c *cancelCtx) propagateCancel(parent Context, child canceler) { |
propagateCancel方法的目的是让父Context被取消的同时,确保子Context也被取消。并且它会设置子Conext的父Context,以便在parent.Done关闭的同时触发child.cancel。propagateCancel方法的执行流程如下所示: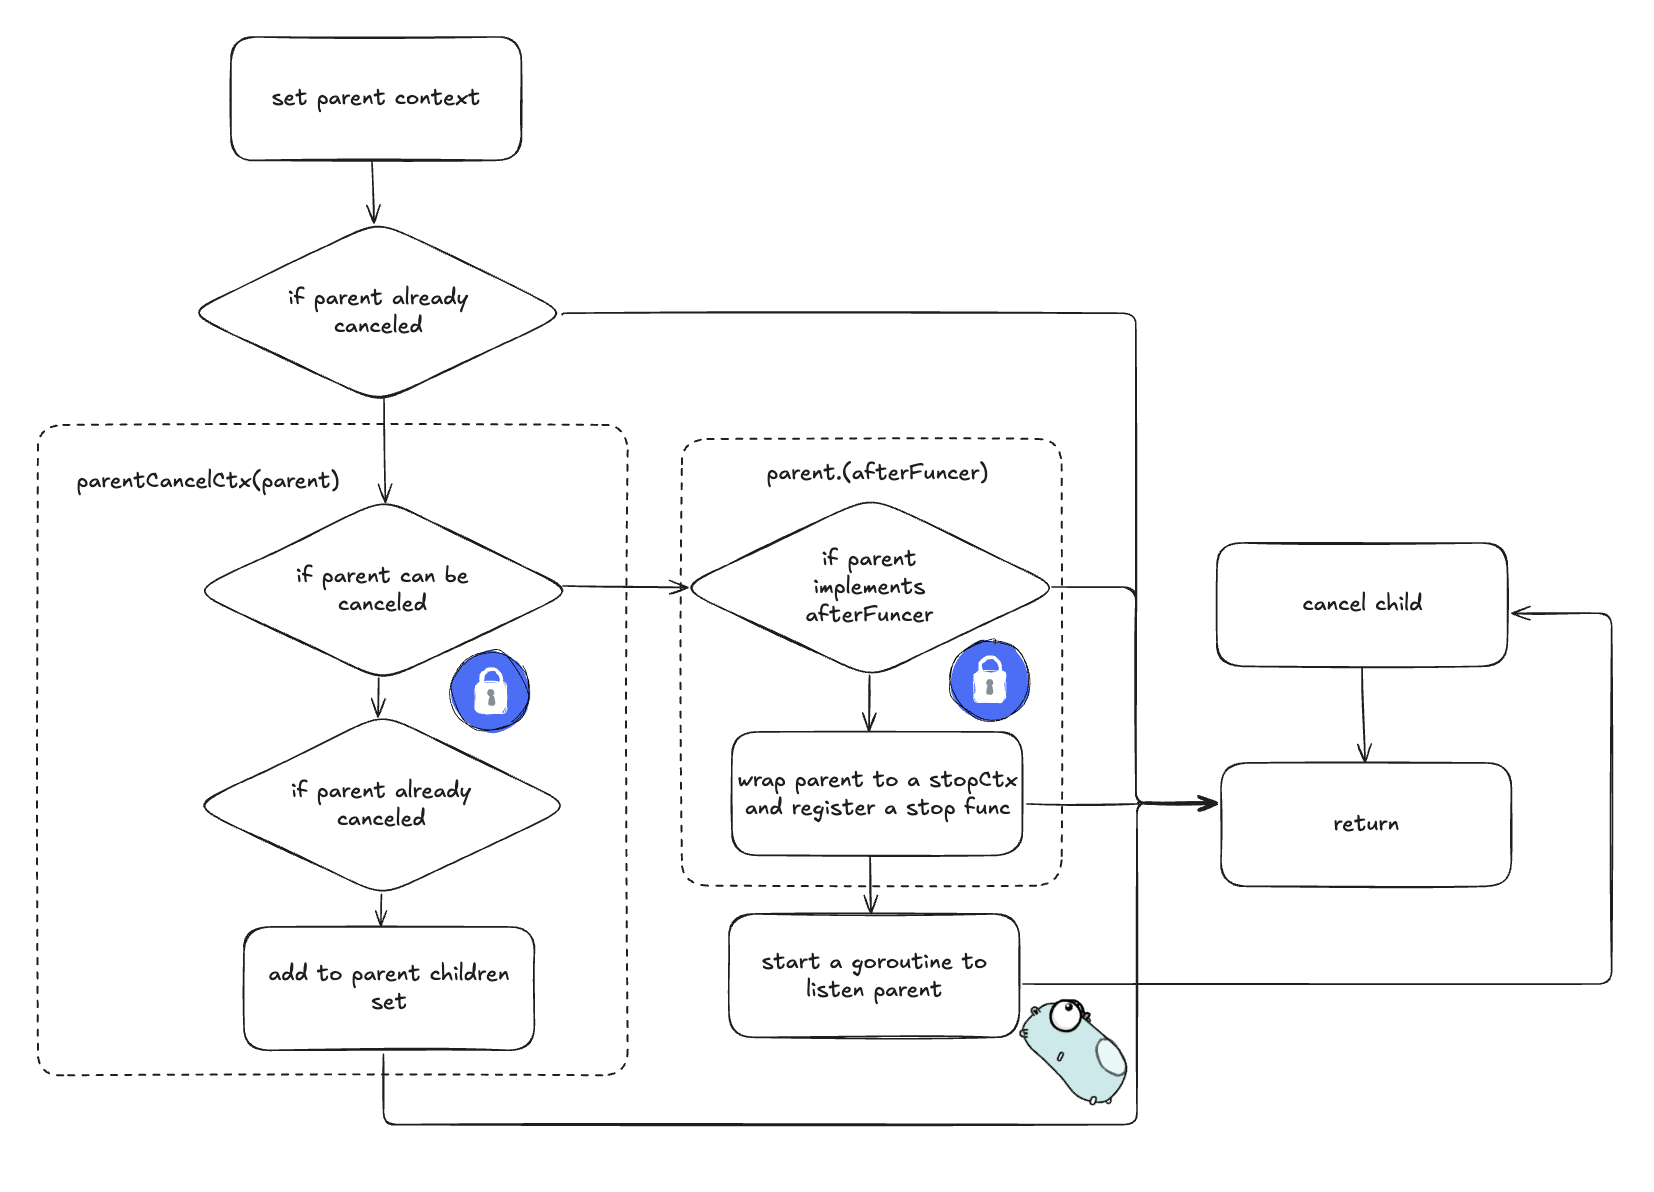
- 首先设置
parent Context; - 根据
parent.Done是否为nil来判断parent是否可被取消(emptyCtx的channel为空)。如果不可被取消也就不需要给child设置任何机制来监听parent的取消信号,因此直接return; - 判断
parent是否为cancelCtx,如果是,则上锁,并判断其是否已被取消。如果是,则直接将child取消,如果没有,则将child加到children集合中; - 判断
parent是否实现了afterFuncer接口,如果是,则将parent再包裹一层为stopCtx,并注册一个stop函数。这个操作会使得在parent被取消时,同步执行child注册的回调函数,也就是将其同步取消。stop则可以取消这个回调函数的执行; - 如果执行到最后,就会直接起一个goroutine监听
parent的取消信号,在parent被取消时取消child。
这里让我们一起思考两个问题:
- 明明在方法的最后是会起一个goroutine去监听
parent的channel的,为什么还要在方法最开始的地方再做一次非阻塞式的监听呢?
这里其实是做了一个优化的策略,能够让子Context尽早地被取消掉。假设我们传入的父Context是一个cancelCtx,那就可以发现代码中有三个地方能够监听到父Context的取消事件:
- 非阻塞式
selectparentCancelCtxcase 当中的parent.Err != nil判断- 最后兜底的goroutine
通过这三处的判断就可以尽早地发现“父Context被取消”这一事件,并及时作出处理。
此外,这种策略还能够更好地应对多线程下并发执行取消动作的情况。- 在
parentCancelCtx这个case当中,为什么在parent未被取消时只做了一个将child加入到parent.children集合的动作?
因为我们这个方法的本质目的是做到当父Context被取消的同时,确保子Context也会被取消。而在parent.cancel被调用的时候是会将children集合中的所有Context都取消掉的,因此在这里直接加入即可。
1 | func (c *cancelCtx) String() string { |
String方法也很简单,调用通用的contextName方法获取名称,拼接字符串返回。
1 | func (c *cancelCtx) cancel(removeFromParent bool, err, cause error) { |
cancel是cancelCtx的核心方法。这个方法有三个入参,removeFromParent是一个bool,表示是否要将当前的cancelCtx从父Context的children当中删除;err是cancelCtx被取消后需要展示的错误;cause是cancelCtx被取消的原因。cancel方法的执行流程如下所示: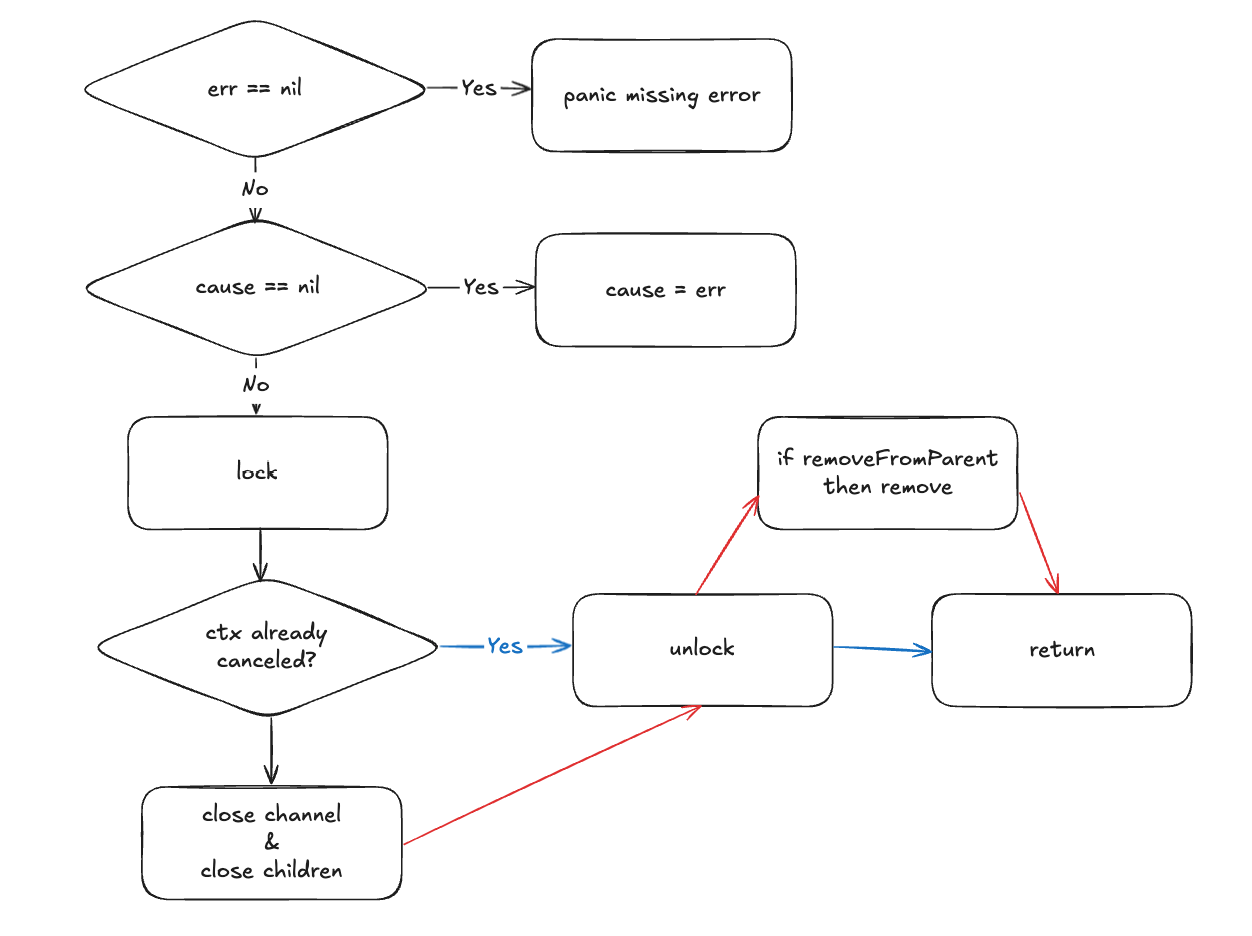
- 首先检查参数
err是否为空,若为空则panic。检查cause是否为空,如果为空则让传入的err也作为cause; - 加锁;
- 检查当前的
cancelCtx是否已经被取消了。这里检查的方式是根据err字段是否为空来进行判断,因为取消会将err字段进行非空的赋值,因此如果此时已经为非空,则说明已经被取消,解锁返回; - 如果没有被取消,则进行取消操作:将
err和cause字段赋值为传入的对应参数。对于channel,则判断其是否已经被初始化,如果未被初始化,则直接赋值为closedChan(一个可复用的已关闭的channel),否则直接关闭该channel; - 遍历当前
cancelCtx的子Context,将它们都采用相同的方式cancel。此时因为对于每个子child而言,父Context,也就是当前的cancelCtx已经被cancel掉了,因此传入的removeFromParent固定为false; - 解锁;
- 根据传入的
removeFromParent判断是否需要调用removeChild将当前cancelCtx从父Context的children中移除掉。
1 | func removeChild(parent Context, child canceler) { |
观察removeChild方法是如何将cancelCtx从父Context的children中删除的:
- 首先判断
parent是否为stopCtx,如果是的话就调用它的stop方法并返回。这里的stop方法是用于取消AfterFunc执行的,我们注册的AfterFunc为child.cancel,而此时child已经被取消了,不需要重复执行; - 如果不是,则调用
parentCancelCtx方法判断parent是否为cancelCtx,也就是看它能不能被取消,如果不能的话就直接返回; - 如果是,并且
parent存在children,则加锁并从其中删除当前的child; - 解锁返回。
1 | func parentCancelCtx(parent Context) (*cancelCtx, bool) { |
parentCancelCtx中判断了parent是否为可取消的cancelCtx。其执行流程如下:
- 根据
parent.Done判断其是否不可取消done == nil或者已经取消done == closedchan,如果是的话则返回false; - 从当前
parent开始,沿着Context链往上查找cancelCtx; - 如果找到,并且就是上一级的
parent(因为这里找到的cancelCtx可能是更上级的),则返回true;
1 | type CancelFunc func() |
WithCancel方法是用于获取一个可取消的Context的public方法,它接收了一个Context作为parent,并会通过调用withCancel来初始化一个cancelCtx并实现对parent取消信号的监听。在withCancel内部,直接调用了cancelCtx.propagateCancel来实现。返回值除了创建出的cancelCtx外还有一个CancelFunc,调用它就会调用内部的cancel方法将创建出来的cancelCtx给取消掉。
1 | type CancelCauseFunc func(cause error) |
WithCancelCause方法与WithCancel很类似,只是这里多了一个返回值CancelCauseFunc,让你可以传入一个error作为Context取消的原因。
1 | func Cause(c Context) error { |
Cause方法是为了返回Context被取消的原因,也就是cause字段。但其实只有cancelCtx才有cause这个字段,更准确地说,对于用户而言,只有WithCancelCause创建出来的Context才有特定的cause,否则对于cancelCtx而言,err与cause值相同,对于其余类型的Context则根本不存在cause,直接返回err。
afterFuncCtx
1 | type afterFuncCtx struct { |
afterFuncCtx可以看作是对cancelCtx做了增强,它增加了两个字段:
once用于确保并发情况下的单次执行,它会被用于实现是否运行f的控制;f则是一个回调函数,它会在cancelCtx被取消时被调用。
1 | type afterFuncer interface { |
afterFuncer接口中包含一个函数AfterFunc,它会接收一个函数f并返回一个函数stop。函数 f是会在Context被取消时调用的回调函数,而 stop则是用于取消f的调用的函数。也就是说,f和stop中只有一个会被执行,这个控制的实现则依赖于afterFuncCtx.Once。如果一个Context实现了AfterFunc函数,则表示它会采用上述机制来进行控制。
1 | func AfterFunc(ctx Context, f func()) (stop func() bool) { |
AfterFunc是一个public函数,它会将传入的Context参数作为parent,f作为回调函数,并基于此实例化一个afterFuncCtx。这个afterFuncCtx会监听ctx的取消信号。返回值是一个stop函数,在这个方法内部它会与f进行once锁的争抢,如果获取成功则会继续执行,调用afterFuncCtx.cancel方法,并返回true;如果返回了false,则说明f函数会被执行。
1 | func (a *afterFuncCtx) cancel(removeFromParent bool, err, cause error) { |
可以看到,在afterFuncCtx.cancel当中,实际上与cancelCtx的取消方式是类似的。只是它在最后会尝试去获取Once锁,如果获取成功则会起一个goroutine去执行f回调函数。
1 | type stopCtx struct { |
当父上下文注册了AfterFunc时,stopCtx会被用作cancelCtx的父上下文。它包含了用于取消AfterFunc方法执行的stop方法。
withoutCancelCtx
1 | func WithoutCancel(parent Context) Context { |
withoutCancelCtx在parent被取消时,它也不会被取消。它没有Deadline和Err,Done channel也是nil,并且对这个Context调用Cause也同样会返回nil。
这也就意味着,它可以用于当parent被取消时,执行一些额外的处理逻辑。
timerCtx
1 | type timerCtx struct { |
timerCtx包含一个timer和一个deadline,这个timer会被cancelCtx.mu管理。它embed了一个cancelCtx用于实现Done和Err方法,并且通过停止timer和调用cancelCtx.cancel来实现取消。
1 | func (c *timerCtx) Deadline() (deadline time.Time, ok bool) { |
Deadline和String的实现都比较简单,不再赘述。
1 | func (c *timerCtx) cancel(removeFromParent bool, err, cause error) { |
在cancel方法中,直接通过调用内部cancelCtx的cancel方法来完成取消,并同时停止了内部的timer计时器。注意这里在停止timer的时候使用了mu来进行并发控制。
那这个timer里保存的是什么,它会做什么,又是在哪里初始化的呢?让我们接着往下看。
1 | func WithDeadline(parent Context, d time.Time) (Context, CancelFunc) { |
这里有两个公开的方法,都可以用于初始化一个timerCtx,只是其中一个可以自定义Cause,一个不可以。
对于这个timerCtx而言,如果它的parent的deadline已经比传入的d要早了,那么就会使用相同的deadline。当dealine超过、返回的cancelFunc被调用或是parent的Done channel被关闭时,这个timerCtx的Done channel也会被关闭。WithDeadlineCause方法的执行流程如下所示: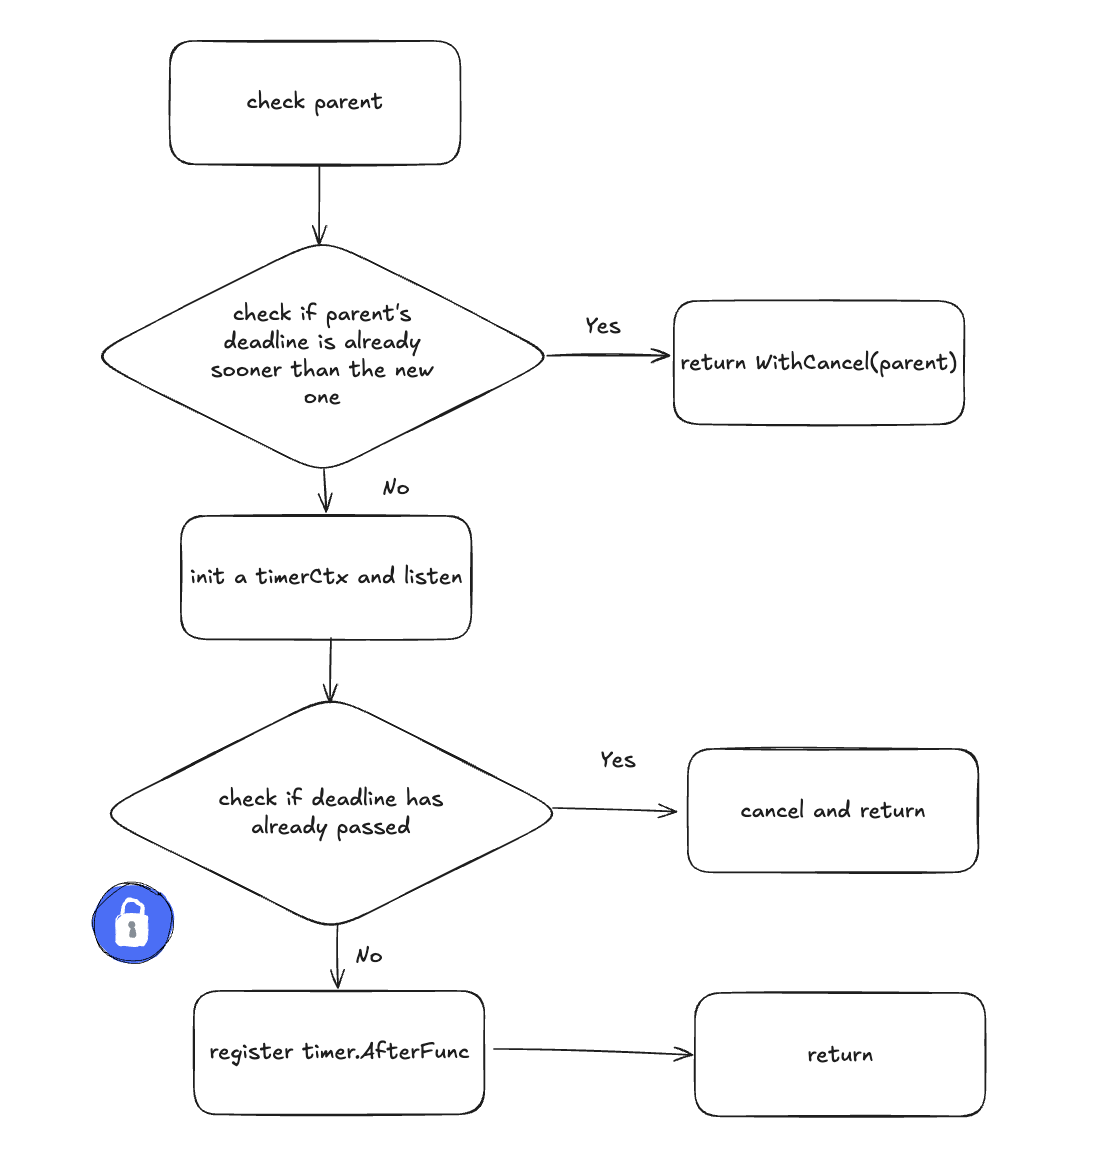
- 参数检查;
- 检查
parent的dealine是否比传入的d更早,如果是的话就直接返回一个WithCancel(parent)。因为不可能存在parent还存在但是child已经被取消的情况,所以这里的返回相当于沿用了parent的deadline; - 初始化一个
stopCtx并对其进行监听; - 检查传入的
deadline是否已经超过,如果是的话就直接取消刚创建出来的stopCtx,并且返回; - 如果没有,就上锁,并利用
timer计时器进行超时回调函数的注册。这里的回调函数也就是会将创建的stopCtx进行取消; - 返回。
注意这里不同分支返回的CancelFunc语义不尽相同,可以联系上下文来进行理解。
1 | func WithTimeout(parent Context, timeout time.Duration) (Context, CancelFunc) { |
WithTimout方法比较简单,就是将timeout转为deadline后调用WithDeadline。
valueCtx
1 | type valueCtx struct { |
valueCtx当中包含了一个键值对,它会为这个key实现一个Value方法,并且将其他的方法调用透传到内部的Context。
1 | func (c *valueCtx) Value(key any) any { |
可以看到,在valueCtx的Value方法中,其实也就是做了一下特判,当key为valueCtx中的key时,返回对应存储的value,否则调用value方法进行查找。
1 | func value(c Context, key any) any { |
可以看到,value中采用了循环的方式,以当前的Context作为起点不断向上寻找。其中valueCtx等类型对应存在不同的特殊处理方式。
1 | func WithValue(parent Context, key, val any) Context { |
WithValue方法会根据传入的参数初始化一个valueCtx,但在文档当中对key提出了一些要求:
- 它必须是非空且可比较的;
key不应该为string或者是任何其他的内置类型,以避免使用Context的包之间发生冲突,使用WithValue的用户应该为key定义自己的类型;- 为了避免在给接口赋值时进行内存分配,
key通常需要有具体的类型struct{};或者是在导出context key时,它的类型应该是指针或者接口。
那为什么要提出这些要求呢?它们是为了解决什么问题?
- 对于第一点而言比较容易理解,因为在
valueCtx.Value当中对key的判断直接采用了==的方式,因此字段必须是可比较的; - 不使用内置类型是为了避免冲突。想象这样一个场景:在
package A当中初始化了一个ctx = WithValue(ctx, "userID", 123),然后在package B当中初始化了另一个ctx = WithValue(ctx, "userID", 234)。因为Value是由下到上(子->父)进行查询的,因此此时userID就会被后来的所覆盖,造成冲突。而如果给key自定义一个类型,那就能保证其唯一性,避免这种冲突的发生; - 当一个具体的类型赋值给一个接口时,可能会发生内存分配,而对于
struct{}而言,它是一个特殊类型,不会占用任何存储空间;或者直接将key定义为指针或接口类型也能减少内存的占用。但是对于接口这种类型而言,需要确保传入的具体值是唯一且可比较的。
1 | func stringify(v any) string { |
由于不想对unicode产生依赖,因此这里实现的stringify方法没有使用fmt,而是直接采用了reflect的方式来获取字符串。