A very nice tutorial, introduces the six message models in RabbitMQ and orovides introductory examples, suitable to the beginners.
RabbitMQ, and messaging in general, uses some jargon.
Producing means nothing more than sending. A program that sends messages is a producer.
A queue is like a “post office” in RabbitMQ. Although messages flow through RabbitMQ and your applications, they can only be stored inside a queue. A queue is only bound by the host’s memory & disk limits, it’s essentially a large message buffer.
Many producers can send messages that go to one queue, and many consumers can try to receive data from one queue.
Consuming has a similar meaning to receiving. A consumer is a program that mostly waits to receive messages。
“Hello World”

Configuring the project
First, use Spring Boot to bootstrap and configure our project, and add the essential dependencies in pom.xml.
1 | <dependency> |
Then, create a configuration file Tut1Config.java to describe our Spring beans in the following manner:
1 | package com.example.rabbitmq.tut1; |
We use the @Configuration annotation to let Spring know that this is a Java Configuration and in it we create the definition for our Queue (“hello”) and define our Sender and Receiver beans.
We will run all of our tutorials through the Boot Application now by simply passing in which profiles we are using. To enable this we will modify the generated RabbitAmqpTutorialsApplication class with the following:
1 | package com.example.rabbitmq; |
and add the RabbitAmqpTutorialsRunner class as follows:
1 | package com.example.rabbitmq.tut1; |
Sending
The sender leverages our configuration and the RabbitTemplate to send the message.
1 | package com.example.rabbitmq.tut1; |
Receiving
We annotate our receiver class with @RabbitListener and pass in the name of the queue. We then annotate our receive method with @RabbitHandler passing in the payload that has been pushed to the queue.
1 | package com.example.rabbitmq.tut1; |
Putting it all together
When I run this project, I found the sender sent messages continuously and spaced, and I don’t know exactly why it happened. Then after I read the code again, I realized, it’s simple.
When I set the profile hello-world, sender, the bean: RabbitAmqpTutorialsRunner will be created. And the method run begin. In the run method, it let the main thread sleep duration ms, then the @Scheduled annotation on the send method will start a new scheduled thread and send messages continuously and spaced.
Work Queues
The main idea behind Work Queues (aka: Task Queues) is to avoid doing a resource-intensive task immediately and having to wait for it to complete. Instead we schedule the task to be done later. We encapsulate a task as a message and send it to a queue. A worker process running in the background will pop the tasks and eventually execute the job. When you run many workers the tasks will be shared between them.
Configuration
1 | package com.example.rabbitmq.tut2; |
Sender
We will modify the sender to provide a means for identifying whether it’s a longer running task by appending a dot to the message in a very contrived fashion using the same method on the RabbitTemplate to publish the message, convertAndSend. The documentation defines this as, “Convert a Java object to a message and send it to a default exchange with a default routing key.”
1 | package com.example.rabbitmq.tut2; |
Receiver
Our receiver, Tut2Receiver, simulates an arbitrary length for a fake task in the doWork() method where the number of dots translates into the number of seconds the work will take. Again, we leverage a @RabbitListener on the hello queue and a @RabbitHandler to receive the message. The instance that is consuming the message is added to our monitor to show which instance, the message and the length of time to process the message.
1 | package com.example.rabbitmq.tut2; |
Putting it all together
The output of the sender should look something like:
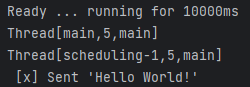
1 | Ready ... running for 10000ms |
And the output from the workers should look something like:
1 | Ready ... running for 10000ms |
Message persistence
To have more control over the message persistence or over aspects of outbound messages, you need to use RabbitTemplate#convertAndSend(...) methods that accept a MessagePostProcessor parameter. MessagePostProcessor provides a callback before the message is actually sent, so this is a good place to modify the message payload or headers.
Note on message persistence
Marking messages as persistent doesn’t fully guarantee that a message won’t be lost. Although it tells RabbitMQ to save the message to disk, there is still a short time window when RabbitMQ has accepted a message and hasn’t saved it yet. Also, RabbitMQ doesn’t do
fsync(2)for every message – it may be just saved to cache and not really written to the disk. The persistence guarantees aren’t strong, but it’s more than enough for our simple task queue. If you need a stronger guarantee then you can use publisher confirms.
Fair dispatch vs Round-robin dispatching
By default, RabbitMQ will send each message to the next consumer, in sequence. On average every consumer will get the same number of messages. This way of distributing messages is called round-robin. In this mode dispatching doesn’t necessarily work exactly as we want. For example in a situation with two workers, when all odd messages are heavy and even messages are light, one worker will be constantly busy and the other one will do hardly any work. Well, RabbitMQ doesn’t know anything about that and will still dispatch messages evenly.
This happens because RabbitMQ just dispatches a message when the message enters the queue. It doesn’t look at the number of unacknowledged messages for a consumer. It just blindly dispatches every n-th message to the n-th consumer.
However, “Fair dispatch” is the default configuration for Spring AMQP. The AbstractMessageListenerContainer defines the value for DEFAULT_PREFETCH_COUNT to be 250. If the DEFAULT_PREFETCH_COUNT were set to 1 the behavior would be the round robin delivery as described above.
However, with the prefetchCount set to 250 by default, this tells RabbitMQ not to give more than 250 messages to a worker at a time. Or, in other words, don’t dispatch a new message to a worker while the number of unacked messages is 250. Instead, it will dispatch it to the next worker that is not still busy.
Publish/Subscribe
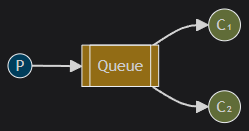
In this part we’ll implement the fanout pattern to deliver a message to multiple consumers. This pattern is also known as “publish/subscribe” and is implemented by configuring a number of beans in our Tut3Config file.
Essentially, published messages are going to be broadcast to all the receivers.
Exchanges
The core idea in the messaging model in RabbitMQ is that the producer never sends any messages directly to a queue. Actually, quite often the producer doesn’t even know if a message will be delivered to any queue at all.
Instead, the producer can only send messages to an exchange. An exchange is a very simple thing. On one side it receives messages from producers and the other side it pushes them to queues. The exchange must know exactly what to do with a message it receives. Should it be appended to a particular queue? Should it be appended to many queues? Or should it get discarded. The rules for that are defined by the exchange type.

There are a few exchange types available: direct, topic, headers and fanout. We’ll focus on the last one – the fanout. Let’s configure a bean to describe an exchange of this type, and call it tut.fanout:
1 | package com.example.rabbitmq.tut3; |
Nameless exchange
In previous parts of the tutorial we knew nothing about exchanges, but still were able to send messages to queues. That was possible because we were using a default exchange, which we identify by the empty string (
"").Recall how we published a message before:
The first parameter is the routing key and the
RabbitTemplatesends messages by default to the default exchange. Each queue is automatically bound to the default exchange with the name of queue as the binding key. This is why we can use the name of the queue as the routing key to make sure the message ends up in the queue.
Now, we can publish to our named exchange instead:
1 |
|
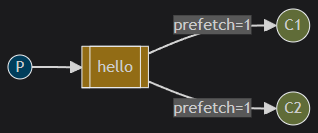
From now on the fanout exchange will append messages to our queue.
Temporary queues
As you may remember previously we were using queues that had specific names (remember hello). Being able to name a queue was crucial for us – we needed to point the workers to the same queue. Giving a queue a name is important when you want to share the queue between producers and consumers.
But that’s not the case for our fanout example. We want to hear about all messages, not just a subset of them. We’re also interested only in currently flowing messages, not in the old ones. To solve that we need two things.
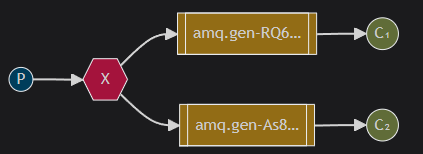
Firstly, whenever we connect to Rabbit, we need a fresh, empty queue. To do this, we could create a queue with a random name, or – even better – let the server choose a random queue name for us.
Secondly, once we disconnect the consumer, the queue should be automatically deleted. To do this with the Spring AMQP client, we defined an AnonymousQueue, which creates a non-durable, exclusive, auto-delete queue with a generated name:
1 |
|
At this point, our queues have random queue names. For example, it may look like spring.gen-1Rx9HOqvTAaHeeZrQWu8Pg.
Bindings
We’ve already created a fanout exchange and a queue. Now we need to tell the exchange to send messages to our queue. That relationship between exchange and a queue is called a binding. In the above Tut3Config you can see that we have two bindings, one for each AnonymousQueue.
1 |
|
Putting it all together
1 | package com.example.rabbitmq.tut3; |
The messages will be lost if no queue is bound to the exchange yet, but that’s okay for us; if no consumer is listening yet we can safely discard the message.
1 | package com.example.rabbitmq.tut3; |
From the result, we can find one message sent to the fanout exchange is consumed by two receivers.
Routing
In this tutorial we’re going to add a feature to the previous tutorial - we’re going to make it possible to subscribe only to a subset of the messages. For example, we will be able to direct only messages to the certain colors of interest (“orange”, “black”, “green”), while still being able to print all of the messages on the console.
Binding
A binding is a relationship between an exchange and a queue. This can be simply read as: the queue is interested in messages from this exchange.
Bindings can take an extra binding key parameter. Spring AMQP uses a fluent API to make this relationship very clear. We pass in the exchange and queue into the BindingBuilder and simply bind the queue “to” the exchange “with a binding key” as follows:
1 |
|
The meaning of a binding key depends on the exchange type. The fanout exchanges, which we used previously, simply ignored its value.
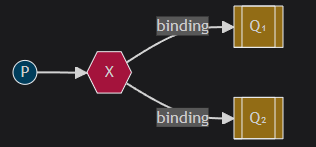
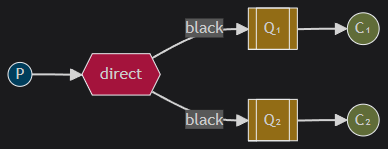
Direct Exchange
Our messaging system from the previous tutorial broadcasts all messages to all consumers, which doesn’t give us the flexibility to allow filtering messages.
We will use a direct exchange instead. The routing algorithm behind a direct exchange is simple - a message goes to the queues whose binding key exactly matches the routing key of the message.
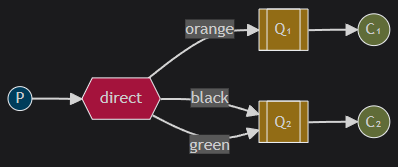
In this setup, we can see the direct exchange X with two queues bound to it. The first queue is bound with binding key orange, and the second has two bindings, one with binding key black and the other one with green.
In such a setup a message published to the exchange with a routing key orange will be routed to queue Q1. Messages with a routing key of black or green will go to Q2. All other messages will be discarded.
Multiple bindings
It is perfectly legal to bind multiple queues with the same binding key. In our example we could add a binding between X and Q1 with binding key black. In that case, the direct exchange will behave like fanout and will broadcast the message to all the matching queues. A message with routing key black will be delivered to both Q1 and Q2.
Putting it all together
Tut4Config:
1 | import org.springframework.amqp.core.*; |
Tut4Sender:
1 | package org.springframework.amqp.tutorials.tut4; |
Tut4Receiver:
1 | import org.springframework.amqp.rabbit.annotation.RabbitListener; |
The message model looks like:

The running result:
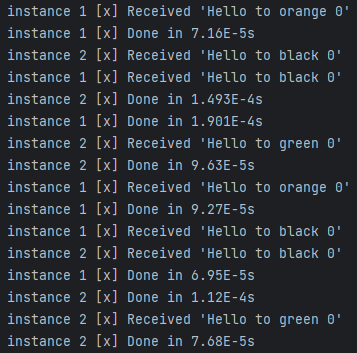
It’s obvious that the black message can be received by Queue1 and Queue2, the orange message can only received by Queue1, and the green message can only be received by Queue2.
Topics
Although using the direct exchange improved our system, it still has limitations - it can’t do routing based on multiple criteria.
In our messaging system we might want to subscribe to not only queues based on the routing key, but also based on the source which produced the message.
Topic exchange
Messages sent to a topic exchange can’t have an arbitrary routing_key - it must be a list of words, delimited by dots. The words can be anything, but usually they specify some features connected to the message. A few valid routing key examples: “stock.usd.nyse“, “nyse.vmw“, “quick.orange.rabbit“. There can be as many words in the routing key as you like, up to the limit of 255 bytes.
The binding key must also be in the same form. The logic behind the topic exchange is similar to a direct one - a message sent with a particular routing key will be delivered to all the queues that are bound with a matching binding key. However there are two important special cases for binding keys:
*(star) can substitute for exactly one word.#(hash) can substitute for zero or more words.
It’s easiest to explain this in an example:
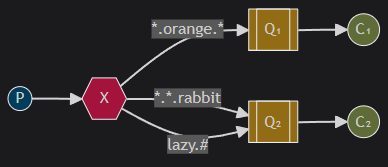
In this example, we’re going to send messages which all describe animals. The messages will be sent with a routing key that consists of three words (two dots). The first word in the routing key will describe speed, second a colour and third a species: “<speed>.<colour>.<species>“.
We created three bindings: Q1 is bound with binding key “*.orange.*“ and Q2 with “*.*.rabbit“ and “lazy.#“.
These bindings can be summarised as:
- Q1 is interested in all the orange animals.
- Q2 wants to hear everything about rabbits, and everything about lazy animals.
A message with a routing key set to “quick.orange.rabbit“ will be delivered to both queues. Message “lazy.orange.elephant“ also will go to both of them. On the other hand “quick.orange.fox“ will only go to the first queue, and “lazy.brown.fox“ only to the second. “lazy.pink.rabbit“ will be delivered to the second queue only once, even though it matches two bindings. “quick.brown.fox“ doesn’t match any binding so it will be discarded.
What happens if we break our contract and send a message with one or four words, like “orange“ or “quick.orange.new.rabbit“? Well, these messages won’t match any bindings and will be lost.
On the other hand “lazy.orange.new.rabbit“, even though it has four words, will match the last binding and will be delivered to the second queue.
Topic exchange
Topic exchange is powerful and can behave like other exchanges.
When a queue is bound with “
#“ (hash) binding key - it will receive all the messages, regardless of the routing key - like infanoutexchange.When special characters “
*“ (star) and “#“ (hash) aren’t used in bindings, the topic exchange will behave just like adirectone.
Putting it all together
Tut5Config:
1 | package com.example.rabbitmq.tut5; |
Tut5Receiver:
1 | package com.example.rabbitmq.tut5; |
Tut5Sender:
1 | package com.example.rabbitmq.tut5; |
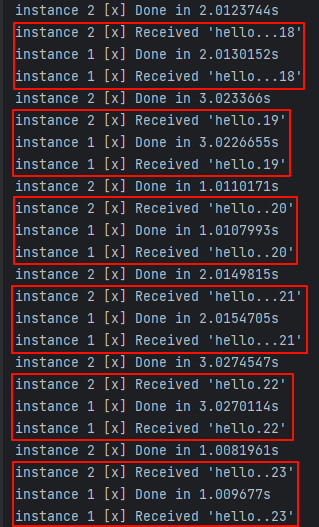
The output from the sender will look something like:
1 | Ready ... running for 60000ms |
And the receiver will respond with the following output:
1 | instance 1 [x] Received 'Hello to lazy.orange.elephant 1' |
Remote procedure call(RPC)
But what if we need to run a function on a remote computer and wait for the result? Well, that’s a different story. This pattern is commonly known as Remote Procedure Call or RPC.
In this tutorial we’re going to use RabbitMQ to build an RPC system: a client and a scalable RPC server. As we don’t have any time-consuming tasks that are worth distributing, we’re going to create a dummy RPC service that returns Fibonacci numbers.
Client interface
To illustrate how an RPC service could be used we’re going to change the names of our profiles from “Sender” and “Receiver” to “Client” and “Server”. When we call the server we will get back the fibonacci of the argument we call with.
Callback queue
In general doing RPC over RabbitMQ is easy. A client sends a request message and a server replies with a response message. In order to receive a response we need to send a ‘callback’ queue address with the request. Spring AMQP’s RabbitTemplate handles the callback queue for us when we use the convertSendAndReceive() method. There is no need to do any other setup when using the RabbitTemplate.
Correlation Id
Spring AMQP allows you to focus on the message style you’re working with and hide the details of message plumbing required to support this style. For example, typically the native client would create a callback queue for every RPC request. That’s pretty inefficient so an alternative is to create a single callback queue per client.
That raises a new issue, having received a response in that queue it’s not clear to which request the response belongs. That’s when the correlationId property is used. Spring AMQP automatically sets a unique value for every request. In addition it handles the details of matching the response with the correct correlationID.
One reason that Spring AMQP makes RPC style easier is that sometimes you may want to ignore unknown messages in the callback queue, rather than failing with an error. It’s due to a possibility of a race condition on the server side. Although unlikely, it is possible that the RPC server will die just after sending us the answer, but before sending an acknowledgment message for the request. If that happens, the restarted RPC server will process the request again. Spring AMQP client handles the duplicate responses gracefully, and the RPC should ideally be idempotent.
Summary

Our RPC will work like this:
- The
Tut6Configwill setup a newDirectExchangeand a client - The client will leverage the
convertSendAndReceivemethod, passing the exchange name, the routingKey, and the message. - The request is sent to an RPC queue
tut.rpc. - The RPC worker (aka: server) is waiting for requests on that queue. When a request appears, it performs the task and sends a message with the result back to the client, using the queue from the
replyTofield. - The client waits for data on the callback queue. When a message appears, it checks the
correlationIdproperty. If it matches the value from the request it returns the response to the application. Again, this is done automagically via theRabbitTemplate.
Putting it all together
Tut6Config:
1 | package com.example.rabbitmq.tut6; |
Tut6Server:
1 | package com.example.rabbitmq.tut6; |
Tut6Client:
1 | package com.example.rabbitmq.tut6; |
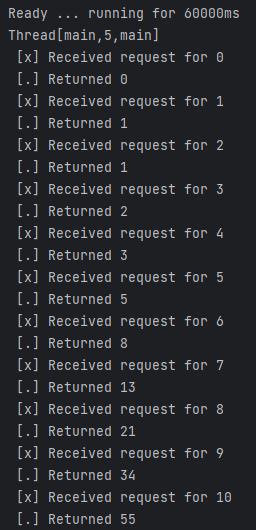
The output from the sender will look something like:
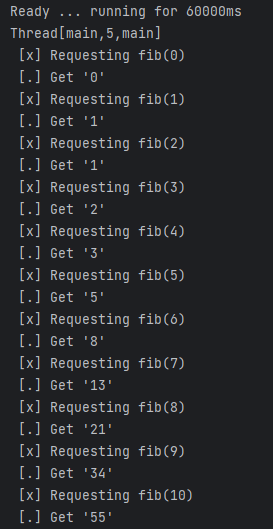
And the receiver will respond with the following output: